Photography is an art form that thrives on the balance of light and shadow. Every photographer, whether an amateur enthusiast or a seasoned professional, understands that lighting can make or break a shot. In this blog post, we will delve into how various lighting equipment affects photography results, whether it's natural light, studio lights, or portable options. Let's explore the essential components of lighting that every photographer should consider to elevate their craft.
The Significance of Lighting in Photography
Lighting plays a crucial role in photography. It can create mood, set the scene, and direct focus to certain subjects within the frame. Understanding the significance of good lighting can fundamentally alter the way you capture images. Here's how:
1. Mood and Atmosphere
The quality of light changes the emotional interpretation of an image. For instance, soft, diffused light can evoke feelings of tranquility, while harsh, direct light might create a sense of urgency or drama. Photographers often work during the "golden hour," the period shortly after sunrise or before sunset, to capture this magical, warm glow that enhances the overall mood.
2. Subject Emphasis
Proper lighting can guide the viewer's eye to the main subject of the photograph. Well-placed lighting can create contrasts, highlighting your subject while subtly fading the background. This ensures that your primary focus is showcased as intended, with the surrounding elements supporting rather than detracting from it.
Types of Lighting Equipment
Understanding the different types of lighting equipment available is vital for enhancing your photography results. Here we will discuss several options that every photographer should consider for various situations.
1. Natural Light
Natural light is often regarded as the best light source. It's free, abundant, and possesses a dynamic quality that can bring life to any photograph. However, controlling natural light can be challenging. Here are some tips on utilizing natural light effectively:
- Explore different times of day: The characteristics of natural light change throughout the day. Early mornings and late afternoons provide soft, warm tones while mid-day sun can create stark shadows.
- Find locations that work: Locations with a balance of shade and sun can provide the ideal setting for natural light photography.
- Utilize reflectors: Simple reflectors can bounce natural light onto your subject, illuminating shaded areas and creating a more balanced exposure.
2. Continuous Lighting
Continuous lighting is indispensable for indoor photography. It consists of light sources that remain on, allowing photographers to see how shadows and highlights will appear in their shots. Here are some common continuous lighting types:
- LED Panels: Energy-efficient and portable, LED panels offer soft, even light, perfect for various shooting scenarios.
- Fluorescent Bulbs: Often used in studio setups, they provide a diffused light source that minimizes harsh shadows.
- Softboxes: These are designed to diffuse light, creating soft shadows and a flattering appearance for portrait and product photography.
3. Flash and Strobe Lights
Flash and strobe lights are essential for freezing motion and balancing exposure when light levels are low. Understanding how to manipulate these types of lights can significantly enhance your photography:
- Built-in Flash: While convenient, built-in flashes can sometimes create harsh shadows. Learning to diffuse the light can improve its quality.
- External Flashes: Off-camera flashes can be angled or bounced, allowing greater control over the direction of light and its intensity.
- Studio Strobes: Ideal for professional studio setups, strobes provide high-intensity light that can be used to illuminate large areas or specific subjects with precision.
Lighting Techniques for Outstanding Results
Now that you know about different types of lighting equipment, let’s dive into some techniques to maximize their effectiveness in your photography.
1. The 45-Degree Rule
A popular technique in portrait photography is the 45-degree rule, where the light source is set 45 degrees away from the subject. This technique creates depth and dimension, making the subject appear more engaging. Experimenting with angles will help you discover unique variations in highlights and shadow placement.
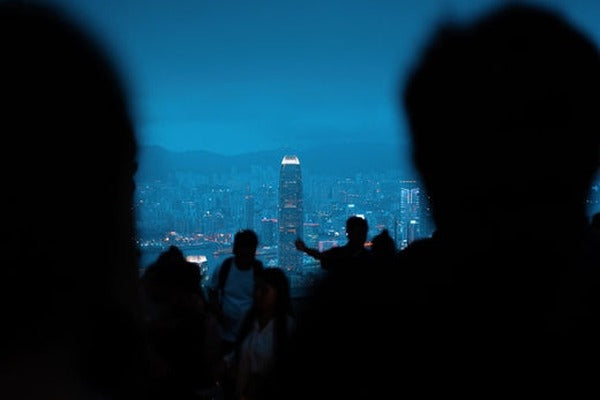
2. Backlighting
Backlighting occurs when the light source is behind the subject, often resulting in a halo effect that creates stunning silhouettes. This technique can effectively convey emotion and drama in your images. Make sure to adjust your camera settings to properly expose the subject while allowing the background to shine.
3. High Key and Low Key Lighting
These contrasting lighting techniques create very different moods in your photography:
- High Key Lighting: This style uses bright, even lighting to produce minimal shadows, often conveying an upbeat, cheerful atmosphere. It's commonly employed in fashion and product photography.
- Low Key Lighting: Conversely, low key lighting emphasizes shadows and contrast, creating a dramatic and moody effect. This style is popular in portrait and conceptual photography.
Lighting Equipment for Every Budget
One of the common misconceptions is that high-quality lighting equipment always comes with a hefty price tag. Let's dispel that myth by exploring options that suit varying budgets:
1. DIY Solutions
Photographers can create their own lighting gear using simple materials available around the house. For instance, a white bedsheet can act as a diffuser, softening harsh sunlight, while a cardboard box lined with aluminum foil can reflect light effectively.
2. Affordable Kits
Several brands offer entry-level lighting kits that won't break the bank. These often come complete with softboxes, stands, and bulbs, providing a comprehensive solution for newcomers.
3. Investing Wisely
For those ready to invest more in their craft, consider purchasing professional lighting equipment gradually. Start with the essentials, like a reliable external flash, and build your kit over time while learning what specifically enhances your photography style.
Experiment and Adapt Your Style
Every photographer has a unique approach to lighting. The key is to experiment with different equipment and techniques to discover what works best for you. Don’t hesitate to step out of your comfort zone. Play with shadows, highlights, and various sources of light to create stunning imagery that reflects your artistic vision.
1. Capture Movement
Use high-speed sync with your flash or strobe to freeze motion, capturing dynamic scenes with sharp clarity. This is especially useful in scenarios involving sports or fast-paced events.
2. Layer Your Light
Combining multiple light sources—continuous lighting, ambient light, and flash—can yield creative results. Layering different lights helps establish depth and dimension, enhancing the overall visual appeal of your photographs.
3. Document Your Process
Keep a photography journal to document your lighting setups, techniques used, and the results. This practice not only tracks your progress but also serves as a valuable resource to revisit successful strategies in the future.
Special Considerations for Different Genres of Photography
The type of photography you specialize in may dictate your lighting requirements. Let's highlight how different genres may benefit from specific lighting techniques:
1. Portrait Photography
Lighting is essential in portrait photography. Use soft, flat lighting to flatter facial features or more dramatic lighting for powerful expressiveness. A mix of diffused and directed light can bring variety to your portraits.
2. Product Photography
In product photography, consistency is key. Even, soft lighting with minimal shadows improves the professional appearance of products. Consider utilizing light tents to diffuse and evenly distribute light around your items.
3. Event Photography
Events often experience unpredictable lighting situations. Be ready to adapt by carrying a portable light source to ensure you capture every moment with accuracy, regardless of the environmental lighting.
The Never-Ending Journey of Mastering Lighting
Ultimately, mastering lighting in photography is a journey rather than a destination. As you continue to experiment and learn, you will undoubtedly discover the profound impact that lighting equipment has on your photography results. Invest time in understanding the nuances of light, experiment with different setups, and don't shy away from making mistakes. It's through experience that your skills will flourish, and your work will resonate with those who view it.
As you step into your next photography session, remember that lighting is your most potent tool. Embrace it, play with it, and let it become your ally in creating mesmerizing images from every scene that unfolds before you.