Overview
Understanding exposure in photography is key to improving your skills. The three main components—aperture, shutter speed, and ISO—work together to control the amount of light reaching your camera sensor. Mastering these elements allows you to achieve the desired exposure and creative effects in your images. Experimenting with manual settings, using a tripod, and practicing techniques like bracketing can enhance your photography experience.
Understanding exposure is crucial for anyone wishing to elevate their photography skills. The three primary components of exposure are aperture, shutter speed, and ISO. Each of these elements plays a significant role in how images are captured and can drastically alter the outcome of your photographs. Whether you are a seasoned photographer or just starting out, comprehending how these elements interconnect will empower you to create stunning images. Let’s explore each component in detail and understand how they relate to mastering your camera setup.
What is Exposure?
In photography, exposure refers to the amount of light that reaches the camera sensor or film. A well-exposed photograph has the right amount of light, ensuring that details are visible in both the highlights and shadows. Too much light can lead to overexposure, making parts of the image washed out, while too little light can result in an underexposed image where details are lost in darkness. By manipulating aperture, shutter speed, and ISO, you can control exposure effectively.
Diving Deep into Aperture
Aperture refers to the opening in the lens through which light passes. It is measured in f-stops, with lower numbers denoting a larger opening (more light) and higher numbers indicating a smaller opening (less light ). Understanding aperture is essential for managing exposure and depth of field.
How Aperture Affects Exposure
Aperture directly influences the amount of light hitting the sensor. A larger aperture (e.g., f/1.8) allows more light, making it ideal for low-light conditions or when you want a shallow depth of field. This feature is particularly beneficial in portrait photography to blur the background and make the subject stand out.
Conversely, a smaller aperture (e.g., f/16) lets in less light, which is useful in bright conditions or when you want to maximize the depth of field, ensuring more of the scene is in focus. Landscape photographers often leverage this technique to capture stunning images from foreground to background.
Depth of Field and Aperture
- Shallow Depth of Field: Achieved with a larger aperture, ideal for portraits and detail shots.
- Deep Depth of Field: Achieved with a smaller aperture, perfect for landscapes and group shots.
Shutter Speed: The Heartbeat of Exposure
Shutter speed refers to the duration that the camera shutter remains open to let light in. It's expressed in seconds or fractions of a second (e.g., 1/500s, 1s). Beyond controlling exposure, shutter speed is vital for capturing movement and reducing motion blur.
The Dance of Shutter Speed and Light
A fast shutter speed (e.g., 1/1000s) freezes action, making it perfect for sports photography where capturing fast movements is crucial. On the other hand, a slower shutter speed (e.g., 1/30s) tracks movement and is fantastic for creating a sense of motion, such as in waterfall photographs where the water appears silky smooth.
How to Use Shutter Speed Creatively
- Freeze Action: Use faster shutter speeds to capture high-speed activities without distortion.
- Long Exposures: Utilize slower shutter speeds for light trails or breathtaking night shots.
The Soul of ISO
ISO measures the camera sensor's sensitivity to light. The higher the ISO number, the more sensitive the sensor becomes, thus requiring less lighting for a properly exposed image. However, increasing ISO can also introduce noise or graininess, affecting the image quality.
Navigating ISO for Optimal Exposure
Low ISO settings (e.g., ISO 100) are ideal for bright conditions and ensure cleaner images with less noise. In contrast, high ISO settings (e.g., ISO 3200 or higher) are advantageous in low-light situations. However, be cautious as too high an ISO can compromise image quality.
When to Use Different ISO Settings
- Low ISO (100-200): Best for landscape photography or bright outdoor settings.
- Medium ISO (400-800): Suitable for indoor settings where lighting may be limited.
- High ISO (1600 and above): Ideal for night photography or dark environments.
The Exposure Triangle: Connecting the Dots
All three elements—aperture, shutter speed, and ISO—work together in what is known as the exposure triangle. Each side of the triangle affects the others, making it crucial to strike a balance for optimal exposure. Adjusting one parameter will require compensating adjustments in the other two to maintain the same exposure level.
How They Interact
For example, if you want to use a faster shutter speed to freeze motion, you may need to open up the aperture or increase the ISO to maintain the same exposure. Conversely, if you choose a smaller aperture for depth of field, you might need to reduce shutter speed or lower your ISO to prevent overexposure.
Practical Tips for Mastering Exposure
Here are some practical strategies to help you master exposure:
- Get Comfortable with Manual Mode: Take your camera out of automatic mode and start experimenting with manual settings.
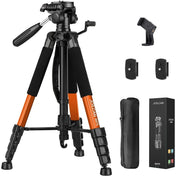
- Use a Tripod: To stabilize your camera, especially when working with longer exposures, consider investing in sturdy equipment like the Kodak PhotoGear 62 Tripod.
- Practice Bracketing: Take multiple shots at different exposures. This technique allows you to learn how adjustments affect the final image.
- Use the Histogram: Familiarize yourself with the histogram on your camera. This graph shows you the exposure levels in your photo and can help you make necessary adjustments.
Conclusion: Taking Your Photography to New Heights
Understanding exposure through the precise control of aperture, shutter speed, and ISO is essential for elevating your photographic skills. As you practice and experiment with these elements, your confidence will grow, allowing you to create images that truly capture your vision. Remember that every photographer has their own style and preferred settings, so don’t hesitate to find what works best for you. Armed with this knowledge, you can explore diverse photography styles, from breathtaking landscapes to dynamic portraits, and capture the world just as you see it.
Linked Product

Kodak PhotoGear 62" Lightweight Tripod with Monopod
The Kodak PhotoGear 62" Lightweight Tripod with Monopod offers versatility for photographers and content creators, allowing for stable shots in various settings. Its lightweight design and compact size make it ideal for travel, while the built-in bubble level and rubber feet enhance stability. Additional features like a 3-way head and Bluetooth remote provide convenience for capturing images from different angles and distances.
View Product